My Rides

Wednesday, December 21, 2011

Barry Roubaix 2012 - Training Plan

I discussed my goals for the 2012 Barry Roubaix race, this March in Southwestern Michigan in a previous post.  Last year in the 23 mile race, more people finished ahead of me than behind me.  This year, I want more people finishing behind me than ahead of me.

With similar weather & course conditions (cold, dry, sunny) I've estimated that means I need to be 20% faster.  I'm 20% lighter (and shrinking), and I think more powerful (I'll get a measure when I perform my time trial to set my training levels), so I think this is very realistic.  Also, my bike has more cool stickers.

I spent a few hours developing my training plan up through the race.  The concept is outlined in a previous post.  Generally, I'm combining a program which trains/improves lactate threshold, and V02max, with a CrossFit style body-weight strength/balance program.  I have to wait until the end of January to start training, as I recover from a(nother) surgery.

The plan may not make sense to someone who hasn't read both:

  • Chris Carmichael's "The Time-Crunched Cyclist"
  •  Mark Lauren's "You Are Your Own Gym"
I use short-hand and Kindle location reference numbers throughout.


Wednesday, December 14, 2011

Spring Training Plan - Concept

About a year ago, I started my first cycling training program outlined in Chris Carmichael's "The Time-Crunched Cyclist."  The first few weeks were seriously draining.  In my third "cycle" of this program, the efforts are still just as hard (intentionally so in a progressive program, based on feedback related to current/present fitness level), but I've gotten better at the recovery.  The seriously draining period lasts only a few hours following...

A couple of months ago, I started my first progressive, interval based strength training program - from Mark Lauren's "You Are Your Own Gym".  Again, the first few weeks produced a lot of fatigue, and muscle soreness, between workouts, but now I recover faster.

In the coming year, I really want to progress significantly in my cycling performance, and overall fitness.  My experiences last year tell me I'm ready for a bit more workload.  Basically my concept is to do both programs - cycling endurance training, and strength training - simultaneously.  With a few modifications/caveats:

  1. I'll be adding plyometrics (jumping exercises) on the days I do Power Intervals (VO2 max intervals) based on an article I read by Chris Carmichael.  Basically, I'll warm up on the bike, get off and jump up and down (I'll do specific, cycling focused/beneficial exercises like jump squats, box jumps, etc), and then get back on the bike to do my max-effort intervals.  The total duration of these workouts will be the same as that of the un-modified cycling program, but the intensity will be higher/increased by the addition of the jumps.  The jumps will taper off as my March 24 race approaches.
  2. I'll be mixing in the non-leg (Push, Pull, Core) exercises in on the 3 "rest" days in the cycling program. If these interfere with the cycling recovery, then they will taper off as my race approaches.  This will add about 1 to 1.5 hours per week to my training program.  
  3. I'll be riding 15-20 min, either on the trainer, or on some nearby trails on "rest" days.  This will be done below lactate threshold to allow proper recovery, but should add a little extra "base-building" into the routine.  This will add about 3/4 to 1 hour per week to my training.  
This will increase my training from 6-8 hours per week, to about 8-11 hours per week.  Doesn't seem huge, but the bulk of the added training volume will be intense efforts which should be sufficient to challenge my ability to recover (I expect serious fatigue, soreness, and suppressed immunity for the first few weeks).  I think the biggest benefit of this will be:

  1. Really making me focus my diet on supporting good workouts and recovery (rather than a social thing, or a reward or treat).  Good carbs before, during, and immediately following workouts; good fats, fiber, and lean protein for dinner; and fruits and low-fiber vegetables during the day.  It will be pretty essential to avoid the occasional bad week, huge meal, excessive sweet treats, or I'll really get off track.  Further improving my "tao of food" will be good all around, for me.  
  2. Help me be in shape for a median finish in my big fall race (48 miles, 3+ hours).  This volume and intensity of training is probably more than I need to undertake to meet my goals for my big spring race (23 miles, 1.5-2 hours) - and may even hurt my results a little, if I'm not perfect in my approach (realistically, the program is a "stretch goal", and I expect some mistakes).  However, if I stick with it, I'll probably get over the next hump, and be in good shape for longer events.
My long term goals are to:

  1. Be sufficiently fit to ride in 100 mile mountain bike endurance events (and not struggle to finish)
  2. Have good general fitness to:  run a 1/2 marathon, compete in a mini-triathalon, participate in warrior dash type events, kayak with the family, keep up with my 3 boys.

Friday, December 9, 2011

Recovery

Well, I can after being released after only 2 days in the hospital, and the way I feel, that I don't have any regrets about maintaining my strength training program right up to my surgery.  Balancing on one foot to get dressed, or just sitting up from a laying position (things that prov hard/painful post-op), all seem so much easier.  It may have enlarged the hernia, but the doctors say it needed repair either way...

Anyway, it was something I was wondering if I'd regret, or get scolded about by the doctors - and something I'll probably forget about down the road, so I thought I'd blog it for posterity's sake...

Sunday, November 27, 2011

Cross-Training Shoes


I recently started a CrossFit style training program between cycling programs.  CrossFit seems to mean simple, old-school, exercises using mainly body-weight for resistance - push-ups, squats, jumps, lunges, crunches, etc. I'm following a progressive, periodized program from Mark Lauren's "You Are Your Own Gym."

I started wearing my New Balance MR759 running shoes - which I bought mainly for running hills, and general athletic pursuits.  With all the lunges, and single leg squats, and some of the pulling exercises I found my feet squirming around a lot in the shoe.  When I got them tight enough to feel "stable" for the movements, the shoes felt too tight.

I wanted to be able to "push into" the floor with my toes, etc. for a little more stability, and I like the idea of developing better foot strength and flexibility - benefits that are associated with barefoot training and minimalist shoes.  My garage isn't warm enough to exercise barefoot, and I plan to add sprints and "bounding" to my cross-fit program, so some minimalist shoes seemed like the ticket.

I've been a fan of New Balance shoes for years - I've had and worn a lot of shoes from Merell, Montrail, ECCO, Vasque, but always seem to find gravitate back to New Balance.  So, when I started looking into minimalist shoes, the New Balance Minimus MX20 was my expected favorite.  My local New Balance store didn't stock these - but they fitted using the MT20 (trail version).  They sent me away convinced I needed an 11 EE (even though I always wear 11.5 EE, and I've read to order the Minimus 0.5 size larger).

During my trial workout in an 11 EE, I felt 2 toes (my 2nd and 3rd toes extend past my big toe) squished into the end of the shoe.  Overall, I liked the shoe - flexible, I felt my feet were supporting me for my workout, instead of an inch or rubber...  On side lunges, I still felt squirming.  By the time I had the right size, I was in the 12 EE (one toe still squished up in 11.5 EE).  I was pretty content and ready to call my shopping done, until...

...Until, I decided to give Virbam FiveFingers a try.  I didn't like the squirming on side lunges, and thinking about what I like about the minimalist feel, and the gap to what I thought would be perfect, I started to see why those goofy shoes just might be the ticket...

When I tried them on in the store (REI) it took me about 5 minutes to put them on.  I was pretty skeptical that this would be a shoe I would put up with.  They felt good though - better than expected.  Real grippy - they have these razor-siped soles like winter tires, so on smooth surfaces (like retail store floors), they just stick.

I worked out a few nights in each - the Vibram and the New Balance, and in the end, the Vibrams were the clear favorite.  They just feel right.  I can plant my feet and they don't squirm, without the shoe feeling tight or constrictive.  I can use my toes to push off for lunges, and dig in for my "Let Me Ins".  When I wear them out  my feet feel sore - not like joint sore, but like muscles-got-a-workout sore.

With the decision made, I went for a walk with the boys (ages 3 and 5), one or the other riding on my shoulders 70% of the time.  We were in Houghton, Michigan, which is a hilly town, and there has been snow already this year - so it was a hilly, wet, gravel-ly walk.  We went about a mile total, with maybe 100' elevation gain (and loss - not uphill both ways).

I even found myself wearing them around the house - and wore them for the long (8 hours driving, 10 hour day on the road) drive home - including stops for my boys to "pee on trees" in the snow (on the long stretches between civilization).  Not as comfy as my favorite wool socks, but surprisingly comfy still - given first impressions.

I think the drawback with this will be that I can't really wear them a lot of places - not that that's too bad.  I have other shoes.  The New Balance are "neutral" enough that they look like normal shoes, and could be worn just about anywhere...

Friday, November 18, 2011

Blowout


So, remember that abscess that put me out of commission for my big race.  Well, a hernia developed in the weakened tissue left behind.  So, guess what I get for Christmas...  Yup, another week in the hospital and another month of recovery with no exertion.

I noticed this as a soft lump in my stomach at the end of September.  Since then I tried a week of rest, and that didn't help (or hurt), so I went back to training.  I was at the end of my cycling program - where I'm supposed to take a break, or switch to strength training, so I switched to strength training.

I'm following a CrossFit type program of body-weight exercises.  I've got 1/2 of the garage taken over with benches, steps, medicine balls, and a pull-up contraption thing.  I'm really enjoying it, and I'm missing the bike less than I thought I would be.

Wednesday, October 19, 2011

Smoothies - I drink / chew them alot

This will be a running smoothie journal 
I'll routinely post photos and recipes (rough, except by specific request/comment) and my brief comment on the taste.  So, check back for more veggie porn.

Smoothies have become my favorite way to get many servings of fruits, vegetables, lean protein (whey protein), and healthy fats.  I've been amazed at how much vegetables you can "sneak in" before it doesn't taste like something fun.  Now, I've been drinking smoothies for a few months now, at the same time avoiding sweets, soda (pop), so my taste has evolved not to like "sweet" so much.
1 beet, with greens, 1 apple, 1 stalk celery, 1 handful fresh parsley, 1 handful walnuts, approx 4 oz plain kefir, approx 4 oz cranberry juice, 4-6 baby carrots, 10 count squeeze of honey, whey protein (enough for 20 g protein)
[OK, should have added some berries]

Vegetables that I've found you can sneak in a substantial serving of, without much taste (especially if there's a cup of berries and/or a splash of cranberry juice):  broccoli, spinach, kale, carrots

Vegetables that you can pretty easily taste (not that it's bad, but not always what you want):  sprouts, celery

10/26 (Dinner)
Walnuts (handful), parsley (small handful), kale (2 big leaves), carrots (handful), pineapple (small handful),  tiny slice lemon (with peel), blueberries (handful), kefir - plain (approx 4 oz), cranberry juice (splash), cherry juice (approx 4 oz) , whey protein (enough for 20 g protein)
[This one was delicious]
10/27 (Breakfast)
Pea shoots (small handful), mint leaves, carrots (handful), celery (1 stalk), pineapple (1/2 cup), kefir (4 oz), cranberry  juice (4 oz)
[Delicious, love the mint-leaves]

Friday, October 14, 2011

Remember this jacket?


I wore it for the first time since March.  Yes, ladies, as a vest, with a sleek black Under Armour base layer.  And sorry men, that smile is patented.  It's loose fitting - like inches all around.  Must have stretched in the closet.  Sorry, the paparazzi weren't out on the trails tonight to snap a picture.

This picture got me thinking about this race - my first race - and my goals for Winter training.  I looked into some cyclocross races, but the few I looked into were closed (I waited too long to register).  Some guys at work are organizing group rides, and I may find something to sign up for or convince the family to go to Moab or something (long shot).  Otherwise, my goal is next year's Barry Roubaix race.

I took the time to analyze last year's results, including my placement, and set a preliminary goal for next year.
Of course, I made a graph.  It's kind of hard to see the plot text so here's a summary:
  • It's a histogram - showing race Elapsed Time (E.T.) along the x-axis, an number of riders (finishing around a particular E.T.) on the y-axis.
  • I finished at 1 hour, 53 minutes, and 53 seconds, (the text on the plot off to the right) about 9 minutes behind...
    • average time of 12.1 mph
  • ...the Median time (about 1:45)
    • average time of 13.2 mph
    • more people finished ahead of me than behind me
  • My goal is to finish about 18 minutes ahead of last year's Median time (about 1:35)
    • average time of 14.4 mph, about 20% faster than last year
    • more people finish behind me, than ahead of me
Do I think this is a reasonable goal?  These days I'm riding about 5 days a week, with a plan, and feel 20% faster.  I'm almost 15% lighter, so far.  Finally, and what I expect will make the biggest impact, I got some new carbon-fiber handle-bars that shave 120 grams off my bike's weight (approx. 1% of bike's weight, approx 0.1% of bike + rider weight).  (I bought those bars because they let me move my brake & shifter controls inboard).

Sunday, October 9, 2011

Bike Light - Experience

Related Posts:


I've really gotten into these bike lights.  I've built 2 now, and have even gotten into some light pattern simulation  - mainly to compare patterns of something I don't have to something I do have, to decide how bad I want to have.  I had been holding off writing about them until I can follow up commentary with objective photos.  My digital camera doesn't have a manual mode, so I can't set the exposure and aperture and take apples to apples shots, so those will have to wait.  I still want to note some of those "first impressions" for those tentative about taking the plunge - with questions like:

  • How much is enough light?
  • Should I mount my light to my bike or helmet?
  • How wide of a beam do I need?
I'll "answer" (offer one opinion) those in reverse order.  I'll frame my answers by first describing where and how I ride.  I live in a suburban area.  I mostly ride on unlit paved and gravel roads, with little traffic, sidewalks, and on double-track, single-track trails and in open fields (at a community college near the house).  I ride 15-25 mph off-trail, and 10-<20 mph on trails.  I consider myself an experienced amateur and rode all these places in the daytime for a year before riding at night.

How wide of a beam do I need?
For these areas, and with 200-1000 lumens, I think anything wider than 20 degrees FWHM (full-width, half-magnitude) is too wide.

source:  carclo-optics.com

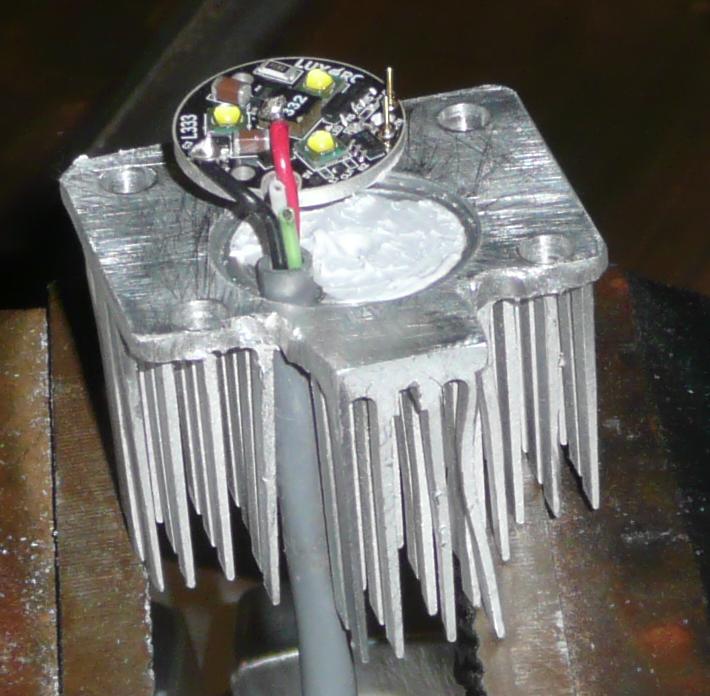
The above is the (initial) beam pattern of (not scaled for my application) of my 3 x XP-G light.  On the sidewalk or single-track trail the reflection from nearby foliage is too bright - limiting how far I can see down the trail.  On a double-track or on a road, I'd just prefer to have more "throw" or redistribute some light from the side down the trail.  One time, while waiting for a friend, I sat at a wide intersection ( 2 lanes, separated by a median), and my light was lighting the top of a 50 foot tall tree across the intersection.  When I compare to my van's head-lights this light seemed to produce more light (than 1 dim light), but was spread out more...

With somewhere near 1000 lumens (my 3 x XP-G light is rated for up to 1280 lumens, excluding lens losses), having the light too wide isn't the end of the world, but it's not optimal (I've changed to the narrow clear lens, which is technically the same width, but 40% brighter in the center).  So, my advice is (especially after studying optics a bit more), if you're using 20mm TIR optics, for trail riding stick with "narrow-clear" (even for single LED lights, even if the lens is  - I'll explain in more detail in a later post).  Stay away from medium, and  especially wide.

How much is enough light?
That depends if you follow my advice on beam-width, and where you mount it.  After riding a couple of weeks with the 1000 lumen, 24 degree wide light, it broke (I broke it - don't ask).  So, I quickly put together my helmet light.  It's a "warm white" XP-G LED, driven at 1A, and should be producing around 250 lumens.  I rode with this for about 3 weeks, using a 20mm narrow-frosted lens (14.3 degrees, FWHM).  Mounted to the helmet, I found 200ish lumens "just enough" for the riding I do.

If you insist that you need or want something wider (excluding elliptical pattern lenses), 200 lumens is NOT enough.  As you spread those lumens over more area, the intensity diminishes rapidly (and, at least for TIR lenses, the total amount of light you get reduces as you attempt to spread it out).  So, for anything over 20 degrees wide, I'd say you need at least 500-600 lumens (rated pre-lens, as most lights seem to be).

But, for a friend, about to spend hard earned money, or precious time building, I would recommend 500-600 lumens for a single light.  Less light, and you'll be wanting more before too long.  More light, should be in a second light.

Should I mount my light to my bike or helmet?
Helmet!  I'll qualify that.  If you're planning 1 light, at least at first, and it's 500-600 lumens, or less, then mount it on the helmet.  The ability to steer the light - to look around an upcoming turn in the trail, or up the trail when things are smooth or down in front of the tire when things are rough, to look down at the bike computer or gears... ...really makes the most of a single light.

If you've got more than 500-600 lumens, you've probably got a big battery pack.  With newer LEDs you can get 500-600 lumens for about 5W power input, and a single (small, light) 18650 battery is good for about 10 W*hr (10 Watts for an hour).  So, you could go for a < 2 hour ride with a battery that doesn't feel too heavy mounted to your head...

Drawbacks to mounting to the helmet:

  • Mounted on top of the helmet, where most convenient, I've bashed the light on tree branches.  
  • I have to get my light right at the front of my helmet, or else the helmet cuts off the light spilling down right in front of my bike.  I'm not sure all helmets and or light mounting schemes will allow mounting to avoid this drawback. 
  • If you look up as you take a drink, or down at your computer you take the light off the trail.
So, for DIY light builders, based on my experience so far, I think the best value (light where you need it vs. cost, weight, complexity, etc.) in lighting is:

  • Cree XM-L LED, with Carclo 26.5 mm elliptical TIR lens, mounted to the handle-bars, and driven at 1-1.4A, by single 18650 Li-ion cell.  This will provide good illumination of the trail in front, and to the sides.  The beamwidth of this light alone breaks my 20 degree rule, but not when considered as a set.  
  • Cree XM-L LED, with Carclo 26.5 mm narrow clear or narrow frosted TIR lens, mounted to helmet, and driven at 1-1.4A, by single 18650 Li-ion cell.  This is your high-beam when riding straight ahead, and the light you steer as the trail turns.  The XM-L gives a nice spill, so a little glance down should illuminate bike computer of gears, without bringing the bright part of the beam down enough to blind you.  
These 2 lights together, will consume about 7-10 W, and significantly outperform (total light output, "throw" of the light or peak intensity, steer-ability) my 3 x XP-G light (also a 10W light).  The batteries for each will be easy to mount, and the bike mounted light could even be driven with a generator hub...  The 26.5 mm lenses are more efficient than the 3x10mm lenses, putting a lot more light down the trail.  The XM-L is more efficient than the XP-Gs...  In a future post, I'll take you through the analysis, calculations, and beam-pattern simulations that lead me to this advice / conclusion.

Saturday, October 1, 2011

These are a few of my favorite things: Bike features and components that help make cycling a joy

It's been a while since a post, largely because I've been doing so much riding at night - when I might otherwise be blogging.  Thanks in part to one of my new favorite things - my bike light(s).  Having the freedom to ride at night, while the kids are being put to bed, or after dinner is great.


Nights are less stressful.  If there errands to run (and there always are), or the family wants to eat out, I don't have to miss out or be the bad guy.  Work is less stressful.  If I'm making progress at the end of the day, I don't have to stress about compromising or missing my workout to take another hour to finish something up.

It's been so long since I gave it much thought, but my Brooks B17 saddles have to be among my favorite (bike) things.  Whether I get on the bike for a serious training ride, clad in padded lycra, or I tuck my slacks in my sock to take the kids to the park I just never notice my saddle.  I've probably ridden over 1000 miles on my mountain bike saddle, and 300 on the utility bike saddle.  I noticed some difference in the feel - tightened the laces on the utility bike's saddle, and ahhh...

I swear it must have rained every day (not all day, and probably not every day) for the last 2 weeks, and I've ridden every day except the last 2 (last night on the elliptical machine, tonight on the trainer).  As I chipped high fiber mud from my bike, and cleaned the chain, I realized I've been neglecting my saddle.  That brings me to another, related, favorite thing.

As I mentioned in my series about choosing and breaking-in the saddle I applied Obenauf's Heavy Duty Leather Protector (designed to protect leather firefighter's boots) while breaking-in my saddle.  Since, I've probably wiped on a quick coat 2 or 3 times (in 7 months).  I've looked and felt under the saddle a couple of times for moisture, mud etc.  My under-seat tool bag protects the biggest area of leather on the underside.  But, with a quick check, I feel the reassuring "waxy" feel of the Obenauf's.

I brought the saddle in tonight to chip off a few pieces of dried mud, give it a good cleaning, and re-apply Obenauf's - I probably still have a few good weeks of muddy riding this year, before sporadic wet snow rides.  As I said, the Obenauf's is wonderful stuff.  The 4 oz. jar is almost gone.  After applying to an old pair of shoes, and having the leather look beautiful, feel soft, it started going on everything leather.  Shoes, boots, wallets, belts.

Last, but not least:  29er bikes.  I kind of came into my 29er without any education or information (on 26er vs. 29er).  I had my mind set on a Cannondale hard-tail, and before I went home with the HeadShok 26er, I wanted to try a bike with the lefty-shock.  I rode it over the little test course outside the bike shop, and it was just so smooth.  At the time I thought I was feeling Lefty vs. Headshok, or the difference a few hundred dollars makes.

Since then, I've read up on 29ers, and gained my own experience.  Lately, on muddy trails, or soggy, grassy fields I just love those wheels/tires.  I built a strong, 36 spoke rear wheel to mitigate one of the 29er's short-comings (especially for a heavy rider) - a weaker wheel...  You see more and more 29ers, and you hear more professionals cite them as the bike of choice for cross-country and endurance races.

Some of the 29ers I dream about owning/riding:

Sunday, September 11, 2011

Congrats Henry and Camile

A good friend married a great girl!  And little did they know:  there was another ninja in attendance!

Saturday, September 10, 2011

Bike Light - The assembly

Related Posts:
With a plan, a set of forstner bits, drill press, band-saw, belt sander, and files I set out to craft my light housing. As I mentioned before, the housing would be made from a PC Northbridge heat-sink (top, right), and about 2" x 2" x 3.5" piece of aluminum (whats remains, top, left).

I'll call the 2 primary pieces of the housing:  the mount, and the heat-sink.  The PCB (printed circuit board), with LEDs and driver circuitry, lens, and o-ring are sandwiched between the mount and the heat-sink - with the mount in front of the light, and the heat-sink to the rear.  I don't use any glue or fasteners to hold the PCB to either the heat-sink or mount.  The heat-sink is fastened to the mount, with 4 screws, and the PCB, lens, and o-ring are compressed between.

A shallow recess is bored into the heat-sink to locate the PCB and lens with a 7/8" (22.2 mm) forstner bit.

The mount is bored from the rear using the same 7/8" (22.2 mm) forstner bit.
The total depth of both bores is a little smaller (<0.5 mm or 0.02") than the total stack-height of the PCB, lens and o-ring.  So, when the heat-sink is fastened to the mount, with the 4 screws (4mm), the o-ring compresses, and the force keeps the PCB pressed to the heat-sink and the whole assembly from rattling.

It would have been nice to have a little tighter bore - 20-21mm (25/32"-13/16"), because the PCB & lens can shift around a little while trying to get things centered and the screws tight.  Home Depot didn't have a great selection, so it's a little roomy.

Before assembly, heat-sink thermal grease is applied between the PCB (which is on an aluminum substrate) and heat-sink, and also between the heat-sink and mount.  Note that care has been taken to make the mating surfaces between the heat-sink and mount as flat as possible (carefully filed) to maximize heat conduction.

The first time I put it together without any thermal grease between the heat-sink and mount, and it felt a little warm after riding.  With thermal grease between, it was cold after riding.  I'll do a stationary test, and see what the surface temp gets up to, but it may be that I could make the whole thing a bit smaller (less heat-sink area) without any thermal issues.

I've gone on a couple of rides, but I'll save those impressions, and some pics of the trail at night for another post.  For now, I'll just say "Wow!"

Thursday, September 1, 2011

Bike Light - The Parts


Related Posts:


This bike light has turned into it's own little hobby.  In addition to the high output bike light, I also have a lower output helmet light in the works, using:
  • LED:  Single Cree XP-G Q4 - warm white (3000K), on star board (ledupply.com, $6.25)
  • Driver:  5-mode, 1000mA "3 x 7135" (IC) based, 3-4.5V input (dealextreme.com, $3.19)
  • Lens:  Various 20mm TIR lenses (ledsupply.com, $1.25 ea)
I pick up my Lux-RC integrated light/driver from the post-office in the morning.  Arriving later this week are:
    • Battery Holders:  (2) 2 x 18650 Li-Ion battery holders (digikey.com, $3.80 ea)
    • Batteries:  4 x 18650 Tenergy protected Li-Ion cells (2 cells, in series, for bike light, 1 or 2 cells, in parallel, for helmet light), with 2-channel charger (amazon.com, $46.99)
    Also pictured:
    • Aluminum for housings, prototypes:  2" x 2" x 12" Aluminum Square Bar (speedymetals.com, $21.73)
    • Heatsink:  The Northbridge cooler from an old PC

    Tuesday, August 16, 2011

    Road Bike - Paint

    This was an experiment with DIY painting with rattle-cans (and perhaps the value and place for a professional finish).   This is not meant to be my rattle-can success story, or recommendation for the method, just what I did, and how it worked (and didn't).

    First I used Duplicolor grease and wax remover on a rag.  This may have been a mistake.  There were a few places where I got paint on the rag.  I wasn't prepared to sand down to bare metal, so I just wiped with a rag once dry, and proceeded.
    Dupli-Color PS100 Prep Grease and Wax Remover Prep Spray - 11 oz

    For primer I used Duplicolor etching primer, and Duplicolor high-build primer.
    Dupli-Color DAP1690 General Purpose Self-Etching Primer - 12 oz.Dupli-Color FP101 Gray General Purpose Sandable Scratch Filler and Primer - 11 oz.
    The etching primer because there were some bare spots, but I ended up coating the whole frame...  After the etching primer (I used the whole can, with about 5 minutes between re-coats), I sanded with 400 grit, and again cleaned with the degreaser.  After the high-build primer I didn't sand.  I kind of liked the flat/coarse texture, so I decided to leave it.

    For the top coat, I used a can or Rust-Oleum flat white, covered with Rust-Oleum Pearl Mist (can't find a pic of this).
    Rust-Oleum 7578838 Professional High Performance Enamel Spray Paint, Flat Black, 15-Ounce
    I really like the look.  It's kind of shimmery, not as "clear" or "fine" as the pearl white on my Toyota van - it's kind of creamy silvery...  There are a few spots with small runs, a few spots with some rough texture to the finish, and a few spots where dust is in the paint.  If someone is interested I'll give some thought to what I. could have done better.  For me, my tests are:

    1. Does it look better from a distance:  Yes!
    2. Does it look better up close:  Yes!
    I didn't like the old paint, so from a distance wasn't hard.  Up close, my few scratches, drips, rough spots, etc. are better than the scratches, peeling stickers, etc. that preceded them.


    Saturday, August 13, 2011

    Bike Light - Concept


    Related Posts:

    Going to build a approx. 10 W LED (ridiculously bright) light for my bike.  Interesting, and perhaps unique features of my light:

    1. Strong thermal connection between LED/Driver, entire housing, AND bike.  Most lights don't seem to take advantage of the fact that the bike can sink some heat too - using plastic mounts, not-very-conductive-looking paths to the mount.  Face-plate and upper bar-clamp will be 1 piece aluminum (2" square bar or 2" hex bar).
    2. Uses recycled (free) Northbridge (from a PC motherboard) heat-sink, that packs a lot of fin area in a lightweight package (>20 sq. in, 1-5/8"x1-5/8"x1", <40 g).
    3. Should be easily machined with access to files, band-saw and drill-press (so, no lathe or mill required)

    Here's a concept sketch, a picture of the LED/Driver module I've ordered, and a picture of a Northbridge heat-sink:

    Source:  Lux-RC Labs
    Zalman ZM-NB32K Northbridge Aluminum Chipset Cooler

    Monday, August 1, 2011

    Road Bike

    Faithful readers who followed the S.U.B. bike build know that I have a racy Dolan cyclo-cross frame set aside.
    It seems to be a nice frame.  It weighs 3.0 lbs (60cm), has a couple of non-round tubes - top tube is round at head tube and morphs to elliptical (wider than thick) at seat-post, down-tube is tear-drop-ish with reinforcement at the head tube.  I understand some/all of the tubes are double-butted, but that's not something I can see...  What I read about it suggests I have a pretty stiff and light frame.  To carry on this theme, I plan to spend a little extra here and there to keep things light - not so much that it will make me faster, but it seems to fit the frame's purpose.  

    I started looking into forks, and choices seem to be (with brake bosses, 700c):
    • Steel (lugged or welded), around $100, 2-2.5 lbs
    • Carbon with aluminum steerer tube, over $200, 1.5-2 lbs
    • Carbon with carbon steerer, over $300, around 1 lb
    I really like Ritchey stuff, but it's expensive, so I "referenced" their forks when looking for something more value priced.  I was about resigned to postponing this build a few months while I saved for and/or justified over $200 for a fork that "fit the frame", and then thought I'd check ebay.  I found a new 2010 Ritchey Comp Carbon Cross Fork for $140 (1.5 lb), with free shipping - that's about 2/3 of retail, and too good to pass up.  


    The paint job on this bike is awfully busy, fancy, and too much like my mountain bike (similar colors).  There are also a few nicks and scratches.  So, I got out the sand-paper, steel wool, and elbow grease (although I found a picture of a product called "Elbow Grease" I didn't actually buy or use this - apparently it's a "personal lubricant").
    Elbow Grease Original Formula 15 Oz
    Now the frame looks like this:
    Logos are off, scratches are gone, and the whole frame is 400 grit smooth.  Next I'll have to prime, and then paint.  I'm undecided on the paint, so any ideas are welcome.  To get the juices flowing, here's the ideas I have so far:
    • School bus yellow, leave the fork black (maybe with black bands on the down-tube and/or seat tube)
    • White, leave the fork black, with "Bicycle" on the down-tube
    • Black
    • Brown metal flake with black candy 
    • School bus yellow base, yellow metal flake, red candy

    Wednesday, July 27, 2011

    Training Un-Resumed

    I commented on my "Training Resumed" post that some soreness, tightness, etc. was due to an abscess (infection).  Well, attempt 1 a fixing said abscess failed, and attempt 2 involved surgery.   While it was rather minor surgery, I think it means I'm off the bike, at least for anything strenuous for a few weeks.  That means no race...

    I'm pretty bummed about that - I'd been working towards that for about a month.  Maybe I'll invest in some weird outfits, and sign up for a cyclocross series this winter...

    Sunday, July 24, 2011

    Stickers on my bike

    I have stickers on my bike.  I think they're worth showing / discussing:
    I do (love Miso).  It's good, and good for you.  I used to travel to Japan a lot for business, and know that around Nagoya they eat red miso, but near Tokyo they eat white miso.  I don't know why, or remember the difference.  I found this sticker in a book / stationary store I visit a lot.

    It says:  "Caution!  Be careful of this person.  This person could be dangerous."  Silly, and pretty fair assessment of my cycling skill.  I'm a fan of "engrish" (silly things in English seen in Japan / China / etc.).  I found this in a department store in Japan.
    It says:  "I am the runaway train."  Another silly sticker from Japan.  I put it on the top tube, where many cyclist often put motivational photos or sayings.  It really just makes me giggle, though.
    Ahh, Faygo.  Detroit's soda-pop.  I drank it (and Nehi, remember Nehi) growing up - usually grape and not red-pop, but beggars (for stickers) can't be choosers.

    Detroit Derby Girls.  I got this after taking my wife to see roller-derby, Detroit style (yes, they actually still do that - no, not quite like in the movie, but pretty close).

    I want to add one more (specifically, I usually just acquire silly things spontaneously) - a Detroit Red Wings winged wheel for the opposite side of the down-tube.